I, Tourist
Wednesday, May 09, 2007
Whenever I am at KLCC taking pictures, I can't help feeling like a tourist. And as much as I want to try out different angles of the famous twin towers, the usual tourist spots for taking pictures usually comes out better. Last Sunday I was with Syscalls and Jibam again taking pictures of KLCC. Actually the truth is, this is the first time I took pictures of the twin towers in HDR.
And, without further delay, I present to you a sunset at KLCC in HDR. Also, one shot when I was in Ikea on Saturday.
 The Two Towers in HDR - 5 exposures HDR
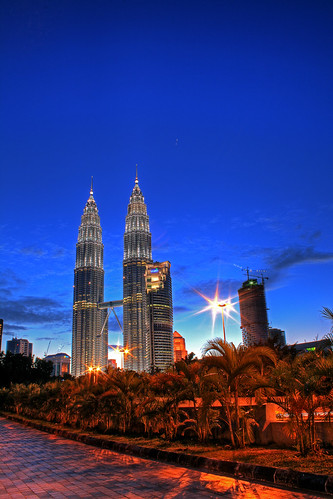
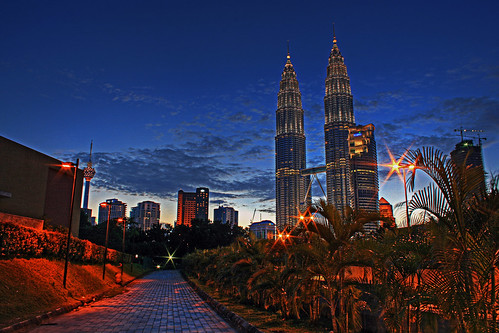 Blue Sunset in HDR
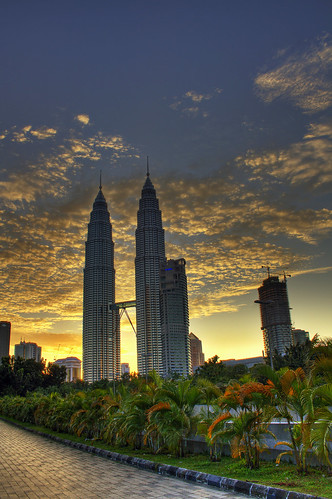 The Sun setting down over KLCC in HDR
 KLCC park in HDR - This is an old HDR images I created when using PowerShot S3 IS. I just re-do the HDR workflow with a different approach on post-processing.
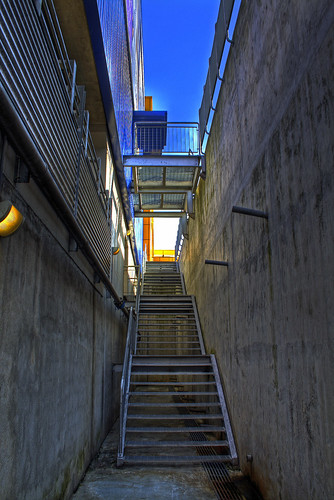 Stairway to Heaven in HDR - As I like to call this stairs at Ikea :-)
OK, tomorrow I'll be posting a simple guide on how to create HDR using Photomatix. I'll be using pictures from this post as an example. I know, I could do it now but then it's raining and it's 7:15AM in the morning. I just want to get some sleep after working through the night.
UPDATE:
Alright then, as promised before I'm gonna make a short tutorial or mini how-to on how to create HDR images. There has been a number of requests from friends that wanted to try out HDR, so here it is. Please take note that I am using Photomatix 2.4.1 so if you are using an older version go upgrade it. Otherwise you might be missing some features available in version 2.4.1.
Before you load up your Photomatix.
For HDR creation, you will have to take pictures using different exposures. The easiest way of achieving this is by using the Auto Exposure Bracket (AEB) function on your camera. If your camera doesn't have it, well you can still take multiple exposures by adjusting the Exposure Value (EV) or Exposure Compensation (EC) manually. The only thing is that you have manually adjust the EV/EC value manually before taking the picture, unlike AEB function where the camera will automatically adjust the EV/EC to the one you set. For HDR purpose, I would suggest that you set your camera at -2,0,+2 EV/EC (at the very least) bracket. Setting your EV/EC values to -1,0 and +1 will not provide enough dynamic range for HDR creation. Once set, just take your picture.
A few words from my humble opinion. There is no good or bad HDR imaging. What makes an HDR good is the picture itself. A bad picture will stay a bad picture. Badly composed and wrongly exposed (at normal exposure) picture will still remain a bad picture, no matter the amount of post processing you give it. Same goes to HDR. A bad picture will make a bad HDR. Period. So before you press your shutter release button, ensure that:
- The picture is correctly exposed (at normal exposure), and
- Compose your picture well.
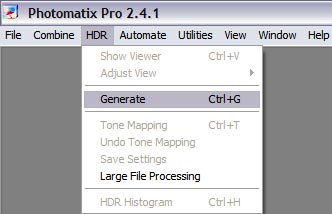
So, let's proceed. Once you have taken your bracketed shots, you can now fire up Photomatix to generate your HDR. We do this by going to the HDR menu tab and click Generate (CTRL +G), as shown below:
Next, a window will pop-up asking you to specify the path to your bracketed images, as shown below:
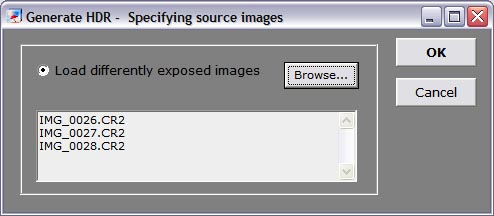 Once you have selected your images, click OK. An option window will appear as shown below:
You will presented with a few options to choose.
Align source images
Select this if you are not using a tripod when taking your bracketed pictures. Photomatix does align your picture but it's not perfect. My advice is that use a tripod unless the situation does not permit it (or if you have strong and sturdy hands).
Attempt to reduce ghosting artifacts
If you bracketed pictures have motion in it, then select this to reduce the "ghosts artifacts". "Ghost artifacts" happens because there are movement of objects in the bracketed images i.e. people walking, moving vehicles, ripples on the surface of water etc. So there are two choices to select from - moving object/people and ripples. The detection level is high and normal. Depending on the amount of movement, normal detection will be good enough in most cases.
The next box contained three more options:
- Take tone curve of color profile: Default when using JPEG.
- Attempt to reverse-engineer tone curve applied: Unless you know what you are doing, this option can safely be ignored.
- No tone curve applied - pixels values are linear: Default when using RAW.
Now the next one is only available if you use RAW. If you are using JPEG or other formats, this option will not be available. This option lets you choose the White Balance and color space when Photomatix is processing your RAW images.
Once you have selected your options, click OK (as usual) and the processing will start. Once done, a preview window will come out as shown below:
Once you have selected your options, click OK (as usual) and the processing will start. Once done, a preview window will come out as shown below:
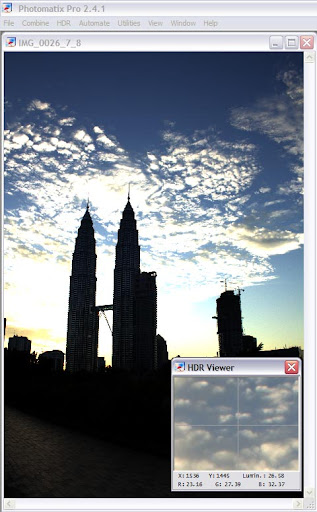
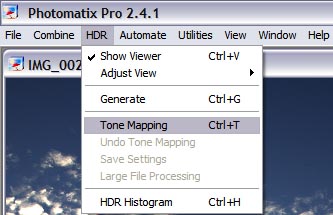
It looks bad isn't it? Well this is HDR in it's truest form. The image has not been tone-mapped... yet. You can safely compare this to your unprocessed camera RAW images. At this stage, I advise you to save it for future usage. Why does it looks bad? It's because our monitors and display screens is not capable of showing the full dynamic range of that picture. To counter this, we have to tone-mapped the HDR picture. We achieve this by going to the HDR menu tab and click Tone Mapping (CTRL +T), as shown below:
Now, another window will open with all sort of options and settings. Believe me, this is the trickiest and difficult part.
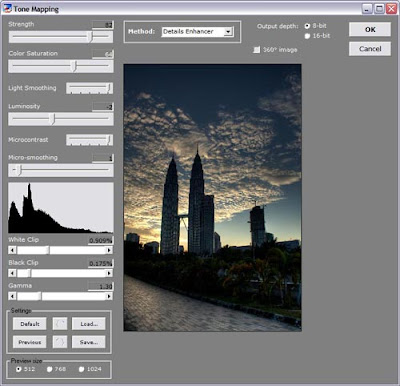
At first glance this is much better, but still not good. As you can see, the setting here are defaulted to the previous settings that I use on a different set of images. The picture is not tone-mapped nicely. Let's take a look on the options here:
Strength: You will need to adjust this along with Light Smoothing. The higher the Strength values are, the darker the picture will be.
Color Saturation: This your standard saturation options. General rule is that to not to over-saturate the picture.
Light Smoothing: This options will need to be adjusted side by side with Strength. The higher the positive values are, the realistic the picture becomes. The higher the negative values are, the more "Halo" effects you'll get. "Halo" effects will give you that glow look especially where high contrast areas meets. Sometimes, "Halo" effects will work with your picture beautifully but most of the times it won't. But hey, it's your choice. Mine is create a picture where it is realistic enough for people to know it's still photography but on the other hand, it is still identifiable as HDR image.
Luminosity: This is where you control luminosity. The higher the positive values are, the brighter the picture becomes and higher the noise is. Higher negative values will make the picture darker. This is similar to Gamma slider whereby you have the option to control mid-tones brightness. The difference it has compared to Gamma, is that it applies more compression.
Micro contrast and Micro Smoothing: This is where you control the local contrast enhancement. If you think your HDR is having to much noise, bumping the micro smoothing to the max will, in a way, help reduce the noise.
White clip and Black clip: Use this to add overall or global contrast by clipping pixels to pure white or pure black.
Gamma: Controlling your mid-tones brightness. Pretty much the same as Luminosity.
Golden Questions
Q: How do you adjust these settings?
A: Up to you. It is entirely based on what you want to achieve.
Q: Any standard settings that I can use for all sets of bracketed images?
A: No. In my honest opinion, there is no such thing as "one-default-setting-that-works-for-all" kinda thing. It is highly unlikely for you to be able to use the same setting for two sets of pictures.
My advice is that, you must play with the settings for all sets of images. The truth is, the settings that is shown above is the setting that I used to process another evening shot, which is around the same time. Notice that in the example picture that I used, the picture came dark and underexposed. That is how it is with tone-mapping options, you have got to try and play different values. There's no free lunch here :)
So after much adjusting, I've came to the most desirable values to get what I want as shown below:
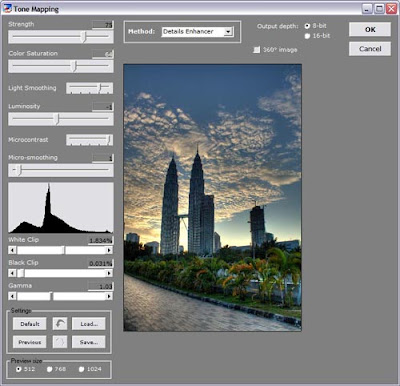
Once you've got what you want - click OK and the tone-mapped image will be generated. Save it as JPEG or whatever file formats you want, and there you have it, your HDR image. As for the example, the HDR picture comes out like this:
The Sun setting down over KLCC in HDRSo there you have it. Give it a try. Once you've got the hang of it, you'll be craving for HDR :)
Feel free to drop by at my FlickR page for some of my HDR works.
Feel free to drop by at my FlickR page for some of my HDR works.
-v-
8 Comments:
commented by  Anonymous, 8:47 AM
Anonymous, 8:47 AM
Wow! Great shots! It's amazing wht u can do with an expensive camera :p

abah: Haha! Jadik tak sabtu ni nak gi outing?
cosmic_gurl: Terima Kasih Cik Bambino. Didn't know cosmic_gurl is actually you!
cosmic_gurl: Terima Kasih Cik Bambino. Didn't know cosmic_gurl is actually you!
Ada tutorial HDR! Bless you!
I dah try HDR before... maaan tak lawa like your... takda masa to really try it properly but I will hopefully soon if I can squeeze some me time.
Your HDRs r the bomb :)
I dah try HDR before... maaan tak lawa like your... takda masa to really try it properly but I will hopefully soon if I can squeeze some me time.
Your HDRs r the bomb :)
great effort bro! thank you.
aku ON..jadi ek?
sapa lagi join? ipin? jibam? mie? pakmat? ragugx?
sapa lagi join? ipin? jibam? mie? pakmat? ragugx?
solace: Thanks! Honestly there have been quite a lot of request on this, so I just had to provide some sort of guideline on it :) Uhmm now, when can I see some of your 350D in action? hehe
raguqx: hehe waiting for your next HDR to be shared. Your landscape are awesome! Would sure look damn nice in HDR.
abah: Aku pun on tapi bebudak takde feedback lagi pun pasal nak gi putrajaya sabtu ni.. kalau ada news update kat my shutterbug group discussion la :)
raguqx: hehe waiting for your next HDR to be shared. Your landscape are awesome! Would sure look damn nice in HDR.
abah: Aku pun on tapi bebudak takde feedback lagi pun pasal nak gi putrajaya sabtu ni.. kalau ada news update kat my shutterbug group discussion la :)
Pak Vedd.. kapan lagi mau berouting ni, kelmarin aku tengok di My Shutterbug eggak jumpa itu update.
rasanya judah lama bangat tak berouting sama pak Vedd ini.
kapan mau pergi mengambil photo, sms lah aku ya.
~ Mas Pak Mat ~
rasanya judah lama bangat tak berouting sama pak Vedd ini.
kapan mau pergi mengambil photo, sms lah aku ya.
~ Mas Pak Mat ~


akhirnya
tak sabar nak tunggu tutorial ni